
Creating Multiple Galleries Using Zeal Pro
April 23, 2018
Start by creating your first Gallery Item (each of these will act as a single photo), or by editing an existing one. On the Gallery Item edit screen, directly above the Featured Image section on the right-hand sidebar where you set the image content, you’ll see a box labelled Gallery Groups.
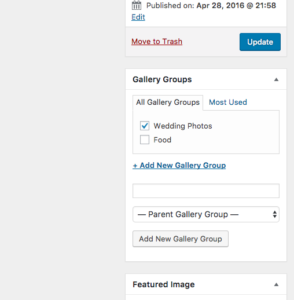
Within this Gallery Groups box, you can click “Add New Gallery Group”. Give your group a short descriptive name, like “Wedding Photos” or “Food”, and make sure the checkbox is checked for any applicable groups you want the photo to be part of.
Once you have some photos assigned to various groups, you can use the [zeal-gallery] shortcode, the Gallery page template, or the Gallery widget to customize how your gallery displays.
The shortcode options can be found below:
group : This can be the word “all” or a gallery group with hyphens and lowercase, such as “wedding-photos”.
limit : This can be “-1”, which will show all existing photos within the group, or any number like “5”, which would show a max of 5 photos.
order : This accepts either “normal” or “shuffle”, with the latter randomizing order each time.
style : This accepts either “justified”, “columns”, or “nested” and affects the way the photos are arranged together.
icons : If you add this option and set it to “show”, a magnifying glass icon will appear when hovering over images.
For example, to display a Gallery with a maximum of 6 photos, all of which are from a “Wedding Photos” gallery group, displayed in a random order and in the Justified grid style style, the shortcode would be:
[zeal-gallery group="wedding-photos" limit="6" style="justified" order="shuffle"]