
This page is dedicated to Smartcat’s theme Relia. Relia is a WooCommerce-ready, highly customizable WordPress theme by Smartcat. With a skin color picker, transparency control for overlays, custom post types and unique widgets, Relia can be any style that suit your site’s needs.
Read on to find out how to make Relia your own.
Installation & Activation
Once you’ve purchased Relia, you’ll receive an email from Smartcat with a link download your theme file, as well as your licence number. Once you’ve downloaded you purchase, you have two options for installing the theme to WordPress:
1. Install Relia directly through the WordPress uploader:
- Navigate to “Appearance” > “Themes” in your WordPress
dashboard. - Click “Add New”.
- Click “Upload Theme”.
- Click “Choose File” and select the compressed (.zip) Relia file you just downloaded from your computer.
- Click “Install Now”.
- To make Relia the active theme on your site, click “Activate”
2. Install Relia through the Root Folder
- Decompress the Relia (.zip) file that has just downloaded to your machine by double-clicking.
- In your the root folder of your WordPress install, navigate to wp_content > themes
- Copy and paste the Relia file into themes.
- Reload your WordPress dashboard, and click “Themes”. You should now see Relia included.
- To make Relia the active theme on your site, click “Activate
Licence Activation
Your licence key is included in the purchase confirmation email you received from Smartcat. After activating Relia on your site, click on Appearance > Relia Licence.
Copy and paste your licence key into the blank field, click Save then Activate Licence.
Please note – Relia Pro is a single-use licence, meaning it can be active on one domain at a time. It is the user’s responsibility to deactivate the licence before moving it to a new domain.
If you plan to move your Relia Pro licence, please not that deleting the WordPress install while your Relia Pro licence is still active will not deactivate your licence. It may result in permanently preventing you from reactivating your licence on a new site.
Setting Up Your FrontPage
Relia features two large banner areas on the front page: the Header (above the Primary Navigation) and the Jumbotron (below).
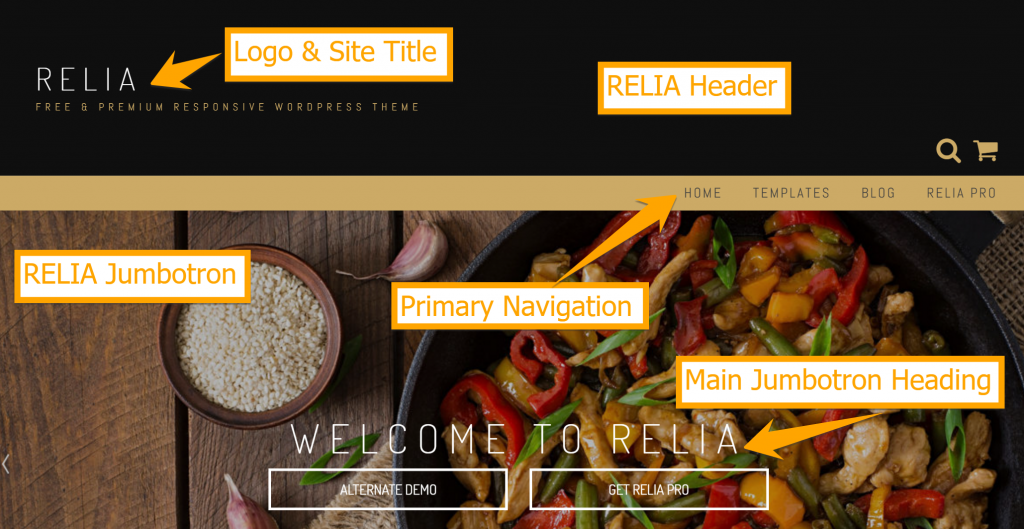
You can display an image in the Header, or a select a static color. To customize, go to Customize > General > Header. Select the Radio button for either Image or Color, then upload / select your preferences below.
From this part of the Customizer, you can also:
- Upload and resize a Logo, which will replace the Site Title.
- Show or Hide the site’s Tag Line
- Show or Hide the WooCommerce Shopping Cart icon
- Show or Hide the Search Icon
The Jumbotron can display up to 5 images in a Slider, or a Single Static Parallax Image. You can set your preferences under Customize > Jumbotron > Jumbotron Settings > Jumbotron Style.
From the Jumbotron Settings page of the Customizer you can also set:
- To show or hide the Jumbotron
- The Jumbotron height in pixels
- The transparency of the tinted Jumbotron overlay
- The slide delay
- The slide transition effect
- The slide loader style (None, Pie or Bar)
- To show or hide the Next / Previous buttons
- The Jumbotron Heading and Font Size
- The Jumbotron button text and links
- The button font size
- The Banner subtitle
- Button text and links
- Disable the Jumbotron
Site Colors, Fonts & Sidebars
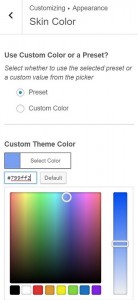
You’ll find the site color, font and sidebar settings under Customize > Appearance.
Under Skin Color, you have the option to set one of the six included color templates, or set a custom selection using an HTML color picker.
Under Fonts, you can set:
- A Primary Font
- A Secondary Font
- The body font style
- The body font size
- The main navigation menu font
Under Sidebars, you can set the Sidebar options for the Blog posts, Post Page and other archive pages. (Other sidebars are set from the Page Template.) Your options are:
- Left Sidebar
- Right Sidebar
- Both Sidebars
- No Sidebars
Widgets & Widget Areas
Relia features four full-width homepage Widget Areas (A, B, C & D), which can each be loaded with several widgets.
You can show or hide these Widget Areas from the Customizer, under Customize > Homepage > Widget Area > Show / Hide
You can set the Widget Area Content from Customize > Widgets.
Each Widget Area can host multiple Widgets.
Relia Pro includes the following Custom Widgets:
- Relia Call To Action
- Relia Contact Form
- Relia Contact Info
- Relia Current Events: Create your Events from the WordPress dashboard under Events > Add New. Then, add the Events Widget to the homepage to display them.
- Relia FAQ: Create your FAQs from the WordPress dashboard under FAQs > Add New. Then, add the FAQs Widget to the homepage to display them.
- Relia Gallery: Create your Gallery items from the WordPress dashboard under Gallery > Add Gallery Item. Then, add the Gallery Widget to the homepage to display them.
- Relia News: Create your New item from the WordPress dashboard under News > Add New. Then, add the Testimonials Widget to the homepage to display them.
- Relia Pricing Tables
- Relia Service
- Relia Testimonials Carousel: Create your Testimonials from the WordPress dashboard under Testimonials > Add New. Then, add the Testimonials Widget to the homepage to display them.
Other Homepage Features
Under Customize > Homepage, you can also find the settings to modify:
- The Feature List CTAs
- The Homepage Featured Articles
- Your Frontpage Content (Static Page or Recent Posts)
To replicate our demo, go to Appearance – Customizer – Frontpage – Frontpage Content and select the Static Page option.
Relia Custom Post Types

Relia features the following pre-formatted custom post types to simplify page design. These can be displayed in Widget areas using their Relia Widgets or set as Page Templates to feed into their own featured pages.
- FAQs
- Events
- News
- Testimonials
- Gallery
WooCommerce- E-Commerce Integration
Relia Pro fully supports the WooCommerce ecommerce WordPress plugin, integrating the product list template (archive) as well as the single product template.
You can use Relia Pro to set up your store, the shopping cart, product descriptions, reviews, etc.
You can install the WooCommerce plugin directly from your WordPress dashboard. Go to Plugins > Add New and then search for WooCommerce in the WordPress directory. Install and activate as per standard WordPress procedure.
Once you activate the WooCommerce plugin, the shopping cart and product sections will automatically appear in your WordPress dashboard.
Relia Pro also features a sidebar specifically for WooCommerce pages, which will also appear under “Widgets” once the plugin is active. You can put any widget into this sidebar – whether it’s a WordPress widget, a theme widget, or WooCommerce-related Cart / Contents /Products / Featured Items. This sidebar will only appear on the Shop and Single Product Pages.
For more help on and FAQs on the WooCommerce plugin, visit their Support page.
Still have questions?
Check out the Relia documentation, the Relia demo site, or contact us through our Support page.