
Athena is a fully-loaded, professional theme for WordPress, including the most desired theme features of 2016. Athena boasts a masonry style blog page and 9 page templates, full-width Front Page Jumbotron with Parallax option, a responsive portfolio image gallery, Woo Commerce support and more.
With built-in testimonial and FAQ features, as well as easy integration with Smartcat’s Our Team Showcase Pro, Athena is well suited for enterprise and small business sites, as well as online stores, creative portfolios and more. Athena truly does it all.
This article walks you through the theme’s key features and setting configurations.
GETTING STARTED
1. Downloading & Installation
Get Athena Pro
Getting up and running on Athena Pro is quick and easy. Download & install the theme today.
You can downloaded a free, limited version of Athena from WordPress, or you purchase Athena Pro from Smartcat.
PRO Immediately following your purchase, you’ll be redirected to a page containing your licence number, and a link to download your compressed theme files. The same information will come to you via email, as well as a link to generate and save your invoice.
When you click the link to download, a new browser tab will open and your download will begin automatically.
To install Athena directly through the WordPress uploader:
- Navigate to “Appearance” > “Themes” in your WordPress
dashboard. - Click “Add New”.
- Click “Upload Theme”.
- Click “Choose File” and select the compressed (.zip) Athena file you just downloaded from your computer.
- Click “Install Now”.
- To make Athena the active theme on your site, click “Activate”
To install Athena through the Root Folder
- Decompress the Athena (.zip) file that has just downloaded to your machine by double-clicking.
- In your the root folder of your WordPress install, navigate to wp_content > themes
- Copy and paste the Athena file into themes.
- Reload your WordPress dashboard, and click “Themes”. You should now see Athena included.
- To make Athena the active theme on your site, click “Activate
2. Licence Activation
PRO Your licence key is included in the purchase confirmation email you received from Smartcat. After activating Athena on your site, click on “Appearance” > “Athena Licence”.
Copy and paste your licence key into the blank field, click Save then Activate Licence.
Please note – Athena Pro is a single-use licence, meaning it can be active on one site at a time. It is the user’s responsibility to deactivate the licence before moving it to a new site.
If you plan to move your Athena Pro licence, please not that deleting the WordPress install while your Athena Pro licence is still active will not deactivate your licence. It may result in permanently preventing you from reactivating your licence on a new site.
3. One-Click Set Up – Importing Settings from Free To Pro
If you started with the free version of Athena and are now upgrading to Pro, you may want to import the settings from Athena. You can do so from the same Athena Licence Page.
Your settings will be replicated in Athena Pro. Please note that the import will override any changes you may have made in Pro version thus far.
After activating your licence, click Import Now and accept the pop-up that appears to be redirected. Click Import again.
SETTING UP YOUR ATHENA HOME PAGE
Setting Up Your Menus & Contact Form
Click Add A Primary Menu from the top left hand of the home page. This will automatically redirect you to Appearance > Menus in your WordPress Dashboard. Alternatively, you can use the Menu tool built-in to the Customizer, under Customize > Menus > Primary Menu > Add Items.
You’ll need to have previously created and published the pages that you want to appear in your menu, even if they’re blank for the time being, so that the theme has an active link to reference when creating your menu.
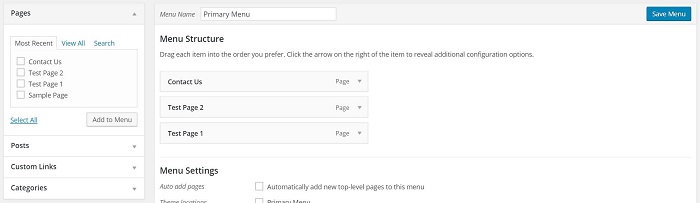
In the WordPress dashboard Menu builder, select the pages from the list on the left menu and click Add to Menu. You can reorder your pages by dragging and dropping them.If you want to create a title for your menu with no active link, (For example, at the top of a drop-down menu) select Custom Link. Simply put http://# in place of the URL, and type the word you want at the top of your menu in Link Text. Then click Add to Menu.
When you’re happy with the menu layout, update the name and click Save Menu.
Next, click the Manage Locations tab at the top of the same page. Select the menu you just created from the dropdown next to “Primary Menu” and click Save. This will add your menu to the top of the Athena Front Page.
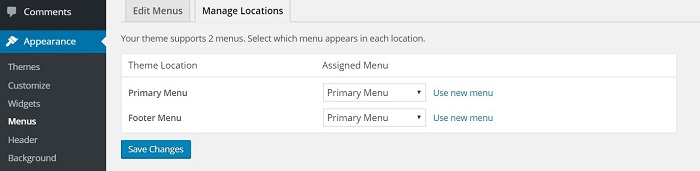
You also have the option to include a Footer Menu, which is a smaller, centered horizontal list of links that appears at the very bottom of your Frontpage, below the Social icons. You can use the same menu you just created for your Primary Navigation, or create and save an entirely new one.
Finally, you’ll notice in the top menu of your Frontpage a small envelope icon just to the right of the Search icon. This is a built-in Contact Form. You can enable or disable this icon, as well as manage the email settings in the WordPress Customizer. Go to Appearance > Customize > Extras > Contact Form. The email you set for Mail Recipient will receive the entries for this form.
Athena Front Page – Logo, Title & Favicon
You can upload a custom logo and favicon for Athena through the WordPress Customizer. Go to Appearance > Customize. For a logo, we recommend an image with a maximum height of 75px.
Configuring the Jumbotron
The Athena Front Page Jumbotron features two full-page slider images in the free version, or five full-page slider images in the pro version.
You can upload the images for the slider, change the slider headlines and edit the button text from the theme Customizer.
Go to Appearance > Customize > Jumbotron in your WordPress dashboard, and then upload images for each slide you want to use.
We recommend images with minimum horizontal length of 1200px. The free version of Athena allows the user to upload up to 2 slides in the Jumbotron, whereas the pro version can include up to 5 slides.

To set a single Parallax image as your front-page, instead of a slider, go to Jumbotron > Jumbotron Settings > Style in the WordPress customizer.
From the Jumbotron Settings section of the Customizer, you can also manage:
- the speed of the image slider (“Slide Delay”)
- the Slide Transition Effect
- the Slide Loader Style (in our demo, we use “Bar”)
- whether to Show or Hide the “Next” and “Previous” buttons on the slider
PROIf you wish to disable the Jumbotron completely, from your WordPress Dashboard select Appearance > Customize > Jumbotron > Jumbotron Settings > Hide.
Frontpage Icon Callouts
The Homepage Callouts are the three boxes that appear directly below the slider. In our Athena Demo, these are the green boxes that say “Responsive,” “Customizable” and “WooCommerce”.
You can edit, or deactivate these boxes completely, from the WordPress customizer. In your WordPress dashboard, go to Appearance > Customize > Front Page > Icon Callouts.
You can select “Show” or “Hide” to enable / disable the Icon Callouts, as well as select an icon, enter your Callout Title and Description for each box. Don’t forget to save your changes.
Your Homepage Content – Recent Posts or Static Page
If you want Athena’s front page to update regularly with the latest content from your blog, then set the homepage to your Posts Page. Your latest posts will appear below the Jumbotron and Callout Icons on the homepage.
Go to Customize > Frontpage > Static Front Page. For Front Page display, select Your Recent Posts.
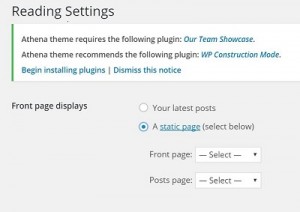
If you’d rather have your Athena Frontpage remain consistent, select A Static Front Page instead.
You can select the specific pages you want to set as your Post Page or your Front Page in the WordPress Dashboard, under Settings > Reading. (If you’re just getting started, you’ll need to first create these Pages under Pages > Add New in your WordPress dashboard, before they’re available to select.)
Homepage Widget Areas
Athena Pro features 10 Widget areas, including a pop-up widget area over the Jumbotron (“Slide Overlay”) and four full-width widget areas on the homepage. You can populate these areas with text, shortcodes, images, or whatever you like.
These widgets can be activated or disabled from the WordPress Customizer. Go to Appearance > Customize > Frontpage and then click in to the Widget area you’d like to enable or disable.
Homepage Widget Area A has a shaded background image in the background that you can edit from the Customizer. Go to Appearance > Customize > Front Page > Widget Area A.
You can change what widgets are in the widget areas from two places: either from your WordPress Dashboard, under Appearance > Widgets; or, from the Customizer under Appearance > Customize > Widgets. To learn more about using widgets in general, check out the WordPress codex here.
Skin Color, Fonts & Icons
Athena Pro features 12 skin colors, which you can preview inour Athena demo.
To select the skin color, the fonts for the header, body, menu and post content go to Customize > Appearance.
From here, you can also chose the sidebar options for your Frontpage, Single Post, Blog & Archive Pages. You Sidebar options for each are:
- Left Sidebar
- Right Sidebar
- Left & Right Sidebar
- No Sidebar
Footer Settings & Social Icons
You can update the links to your social profiles in the Athena Footer by going to Appearance > Customize > Footer. The social icons included for linking are Facebook, Google Plus, Instagram, LinkedIn, Pinterest and Twitter.
From this part of the Customizer, you can also change the Footer Background Parallax image, remove the Smartcat branding from the Footer, and edit the copyright text.
To disable the social icons completely, go to Customize > Extras > Social Sharing > Disable.
Custom CSS & Google Analytics Tracking Code
Athena Pro allows you to add Custom CSS rules to override the theme defaults. Using this CSS editing feature allows you to make changes to the theme’s appearance, without the risk of irreversibly damaging the theme files themselves.
Go to Customize > Extras > Custom CSS. Type or paste the CSS rule you want to add to the field provided. Click Save & Update, close the customizer, and refresh your site to see the changes.
You can also add Google Analytics tracking code quickly and easily from this are of the customizer, rather than having to paste it into the header of multiple pages.
Go to Customize > Extras > Google Analytics Code. Paste your code, click Save & Update.
PAGE TEMPLATES & CUSTOM CONTENT FEATURES
Blog Posts & Blog Layout
Athena Pro features two styles for the blog page.
- A Tiled, masonry style blog page (like a Pinterest board)
- A classic, Stacked blog page
You can chose your style under Customize > Appearance > Blog Layout.
You can also hide the Post Author and Post Date.
To modify the settings for the appearance of your individual posts, (including post date, author, categories and #of comments) go to Customize > Appearance > Single Layout.
Page Templates
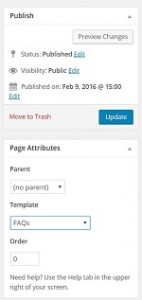
You can customize the Appearance of any page on Athena to look like your Frontpage, have a Parallax slider image, a photo gallery, an FAQ accordian, or different sidebar configurations. On the Page you’re editing, simply select “Template” from the dropdown menu under Page Attributes, just below the Publish settings.
Creating An FAQ Page Or Widget ( Pro version )
To configure your FAQ page, create a New Page and set the Template to FAQs in the Page Attributes section of your editing window. Adding new FAQs is as easy as adding a post or page.
- In your WordPress Dashboard, go to FAQs > Add New.
- Enter an FAQ title and response
- Set a featured image for your FAQ, if you want one, just like a post.
- Click Publish
Your FAQs will appear as an accordian on the new FAQ page you’ve created.
FAQs can also be placed in a Widget. Drag a blank text widget into your desired widget area, and enter the shortcode: [athena-faqs] into it.
Save and refresh your homepage to view the changes.
View the FAQ Athena Demo here.
Setting Up A Testimonials Page or Widget
To set up your Testimonials Page, create a new page, and select the “Testimonials” Template from the Page Attributes section of your editing window, under the Publish settings.
Adding new Testimonials is as easy as adding a post or page.
- In your WordPress Dashboard, go to Testimonials > Add New.
- Enter a Testimonial title and paragraph.
- Click Publish
Testimonials can also be displayed in a Widget. Drag a blank text widget into your desired widget area, and enter the shortcode: [athena-testimonials] into it. Save and refresh your homepage to view the changes.
Creating An Image Gallery
To setup your Gallery, create a new page and name it appropriately, eg. “Portfolio.” From the “Page Templates” box in the right sidebar of your editing window, select Gallery from the drop-down list of Templates.
Your Gallery location is now set. You can proceed by adding images to the Gallery, just like publishing posts. In your WordPress dashboard, go to Gallery > Add New.
Add your title and upload the Featured Image, then click Publish. The Gallery Item will appear in the new Gallery Page you created.
Team Management
When you activate Athena as a theme, it will recommend you download Smartcat’s Team plugin Our Team Showcase. Built and maintained by Smartcat, this plugin is your best option for seamless integration a team display on your website. It also features a Team Portal extension, which allows your Team Members to log in to view restricted content, and manage their own portfolios. Learn more about Our Team Showcase here.
Still have questions?
Answers to the most common questions about Athena Pro can be found on our FAQs page, as well as the WordPress forums. If you’re a Pro user and still stuck, contact Smartcat Support to let us know what you need.